Showing posts with label reusing/repurposing. Show all posts

Thursday, July 5, 2012

3-D Stars Made from Frozen Pizza Boxes

These are easy and cheap DIY Cardboard Star Decorations!!

I finally made some 3D stars out of some frozen pizza boxes that I had been saving and I think they really turned out great! Of course, I didn't come up with this myself, I actually saw it HERE first, but the star there was made from a cereal box.  Cereal box, frozen pizza box.. it's really all the same!  I was so inspired, I just had to give it a try.   I love how they turned out and I'm happy to report they were actually SUPER EASY to make!!!  Don't tell yourself you can't make one of these.. because you can.

I did three of them that were approx. 12 x 12", another one that was about 6 by 6" and then a smaller one that was about 3" and the all turned out fabulous.  Have a look:


So what do you think??  I think that if I didn't know any better, they look pretty much like the expensive metal ones. If you like the look of them, I urge you to give this craft a try.  They are super easy to make and you can make them practically for free if you save your cardboard food packaging. I definitely look forward to making more of these for use around the holidays. 

For more cardboard projects like this one, go to: Cute and Clever Cereal Box Crafts Round-Up


Thank you for dropping by!


Wednesday, May 2, 2012

Thrift Store Makeovers - Desks!


Anyone who has been following this blog so far knows I'm crazy about thrift store makeovers!  I've decided to put together another small round-up of thrift store makeovers.. this time it is desks!  


Makeover #1    
Gorgeous Green Desk
Before....
After!
This desk started out as an old scratched up desk but it's one of those that has lots of character....  Go on over to Design On A Dime for the rest of the story.... LOVE this desk!!  She did such a great job with it.


 ******************************************


Makeover #2     
Beautiful White Desk
Before...
After!
Can you believe the above desk was purchased for only $30 at a thrift store?  That is truly amazing to me.. This desk is gorgeous!  Hope on over to SaVvy Decor to see how she did it!


*********************************************


Makeover #3   
 Fabulous Black and Pink Desk
Before...


After!!!
I LOVE the colors pink and black together and I think this desk came out fabulous!! I like how she matched the bulletin board material to the chair cushion material.. it really turned out great!  To learn more about this re-do go to Mom's By Heart  :)


I can't wait to find a desk of my own to make over! 

Wednesday, February 29, 2012

Thrift Store Makeover - Gorgeous Faux Mercury Glass Lamp


Today's post is about a thrift store makeover and I was very impressed with this one and had to share.  This lamp was purchased from a thrift store for a few dollars..


Before
Here's the finished product!

After

It turned out AMAZING!  It is a faux mercury glass lamp and I must say, it looks like the real thing.  She did a great job!!  Check out Lisa's Creative Designs to see how she did it!

Sunday, February 5, 2012

Gorgeous DIY and Refurbished Chandeliers


I have always loved the the look of chandeliers.  Some of them are so beautiful and amazing!  Unfortunately, new ones usually come at a hefty price.. way more than I would be willing to spend. I wanted to take a look around and see some DIY ideas for them and maybe some that were make-overs and as always the internet delivers! I wanted to share with you what I found.  You will be amazed....

made over chandelier @ Suzie's Cottage
 She purchased this one used and really did a great job fixing it up! I love the crystals and the pretty roses on the chain. Visit the link to see before and after.


hemp pendant chandeliers @ Crafty Nest

I am crazy about these pendant chandeliers. These particular ones were made using hemp but I believe these could also be made using yarn, twine or even jute.  She also has shared a very nice, photo illustrated tutorial.


pretty diy chandelier@Brassy Apple

I love this simple pink one made from wire basket forms.. how cool is that!   I like how it's dressed up with the string of pearls..and the pink chains look really cute.  Of course, if you were doing your own you could slather the pearls and crystals as much as you want. This would be cute for a little girls room. I really appreciate the nice, photo illustrated tutorial too.


aqua chandelier @ Shabbyfufu
I am crazy about using jars and this is NO exception.. LOVE this chandelier.. especially the pretty blue color. There are lots more stunning photos and also an explanation of how this beautiful chandelier came to be.
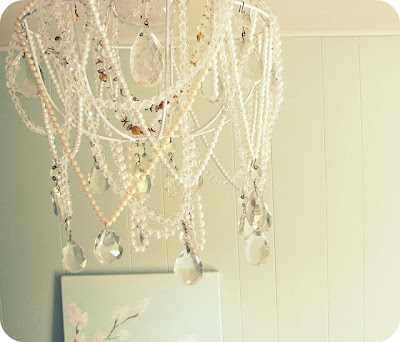


diy chandelier @ My House of Giggles

Another pretty DIY chandelier with lots of strings of pearls and crystals... I LOVE this! Be sure to have a look at all of the pretty photos plus illustrated  tutorial.


diy chandelier @ Gus and Lula
Wow.. this one is gorgeous and there's an awesome illustrated tutorial on how to make it too. It's made using those string beads like you can buy during Christmas or you could use those long mardi gras necklaces which is what I think she used.  I love the blue color of paint that was used. That's another fun thing about this... when you are done making your own, it can be painted any color you want :0)


refurbished chandelier @ Frugally Minded Homemaker
Can you believe this started out as a plain brass chandelier? Hop on over and have a look at the before photo. She's done an amazing job on this. I love the brushed silver look.


refurbished chandelier @ Design Mom
Spray paint can do wonders! This is such a pretty shade of blue.  It has that shabby chic look to it.. amazing!


refurbished chandelier @ Vickie Howell

LOVE this hot pink color..and can you believe she used fabric paint... oh yeah, she sure did and it looks amazing!! Go have a look at how she did it.


 I am super inspired by all of these gorgeous chandeliers.  I kept thinking I couldn't put one up because I live in an apartment but I don't have to actually mount it with a light. I could just make one and hang it up like I would a plant or something. It would still be a beautiful touch to any room.  Time for me to keep an eye out for an old chandelier....

Friday, February 3, 2012

DIY Paper Mache Home Decor

Earlier I was thinking about those neat paper mache boxes that you can purchase at the craft store and even though they are inexpensive, I still always figured you could make your own paper mache box some way.  I did a search to see if I could find a tutorial for one but I got side tracked with all of these other neat paper mache projects.  Look what I found:


paper mache covered bottles @ Loving City Living
Loving City Living  made these super cute bottles by covering them with paper mache made from pages from an old book and then a final coat of Mod Podge was applied... love that stuff! 


DIY paper mache letters @ Green Zebra Crafts
Green Zebra Crafts has the tutorial on how to make fantastic letters from any font you want.... by using, get ready....old cereal boxes!!!!! I think she's done a fabulous job with this and she has shared an awesome photo illustrated tutorial as well.


paper mache lights @ Reese Dixon
How about these cute yard lights made from paper mache by Reese Dixon . I bet these are all colorful and glowing when it's dark. I can hardly wait to try and made some of these myself.  Be sure to check out her very nice, photo illustrated tutorial showing you how to make these strings of lights.


paper mache bowl @ The Lulu Bird


This is a very nice DIY paper mache bowl I found at The Lulu Bird . She has really done a great job! I love the stitching detail around the top rim of the bowl. She has also shared the tutorial as well.


cute paper mache vase @ Life and Art by Andrea Rodgers

Life and Art by Andrea Rodgers  shared how to make this cute vase from paper mache.  I could see making a few of these in different shapes and putting together as a group display.  They kind of remind me of the bumpy texture of the old milk glass vases.. very pretty :0)  She shares the vase tutorial plus the paper mache recipe that always works for her.

Tuesday, January 24, 2012

Faux Metal Wall Decor Made from Empty Toilet Paper Tubes

@ Crescent and Lavender

Can you believe that the piece above is made from empty toilet paper rolls? I can not tell you how impressed I am! It really looks like a heavy piece of wrought iron.  These new spray paints are awesome to be able to make something like paper look like stone or a heavy metal.  Would you like to see more like this with tutorials? 


Sunday, January 22, 2012

Repurposed Dressers

I have been seeing a lot of repurposed dressers lately and they are all pretty awesome! I had no idea that a dresser could be used for so many different things.  Take a look at some of these:

@ diggerslist via Small Place Style


@ show and tell


@ CalFinder

@ Sugar Bee Crafts


@ In my own style


@ grosgrainfabulous


 I also found this post which explains all of the things you could use an old dresser for!

Monday, January 9, 2012

Tips for Repurposing Christmas Decor

photo belongs to cincooldesigns via Flickr


Now that the holidays are over and everything to do with Christmas is priced dirt cheap, this is the time you can really get some bargains that will be put to good use for many years to come.  Christmas comes in every color now so you can use this decor for other  holidays as well.  For example, some of the beautiful ornaments on the gorgeous pink tree above could double as Valentine's Day decor.  I found this really useful post at Thriftyfun on how to make the most out of your Christmas decor.

Friday, January 6, 2012

DIY Candy Jars

DIY Goodie Jars @ Drab to Fab
I found this awesome tutorial for DIY glass candy jars- the pedestal kind. Many of us have old glass jars and glass candle holders around and if you don't, you can pick some up from the local thrift store super cheap. These type jars are those neat apothecary type jars that you see in groupings with bright colored candies in them!  See the tutorial for these cute DIY jars at Drab to Fab!

Saturday, December 31, 2011

DIY Vinyl Wall Quotes and Wall Art

Vinyl wall quotes and wall art can be expensive so I figured out how to make some of my own with just contact paper.  I was looking at Ebay the other day and saw that you can get vinyl fairly inexpensive now according where you get it from.  It doesn't have to be Cricut or Provocraft brand.  All of the ones below were made using painted contact paper.


One day I was looking around on the Hobby Lobby website and came across some framed letters that are like the photo above.  It inspired me to make my own vinyl wall art/quote....spelling "Dream".  Below is the photo of my finished vinyl wall art/quote. What do you think?


This one I made using photoshop, scissors and contact paper.


Here are some more vinyl wall quotes I've done:


 This one is in my little boys room that I made using the Cricut Create die cut machine.


This one is in my living room and I made this one using the Cricut.


You can make your own vinyl wall quotes/art.  There are two different ways I've made them but instead of purchasing special vinyl, I just used spray painted contact paper to make all of these. Contact paper doesn't have to be just for lining shelves :)  Here are links to both ways:


To learn how to make vinyl wall art without using a die cutter go here:


If you have a Cricut or similar die cutter go here:


Have fun saving money and making your own vinyl wall quotes and vinyl wall art!!!


Thursday, December 29, 2011

DIY Headboard Ideas


window pane headboard at bhg.com

Look at this beautiful DIY headboard made out of old window panes. I love the rustic look. To see the headboard pictured above and lots of other headboard ideas go to:

Wednesday, December 28, 2011

DIY Paper Rose Wreath


If you don't mind DIY projects... You can make this pretty paper rose wreath. It's inexpensive to make yet very, very pretty! You can even use paper you were saving to recycle or pages out of a large book that you don't want. Just click on the tutorial and then come back and read the finishing instructions:


Once you've made several roses, cut a big heart out of cardboard (the size you prefer) and then glue the roses all around the heart shape starting on the outside working in.  After you have the heart covered with roses, cut out  some ribbon and glue it to the back of the heart shape.  Then tie a bow and hang it up!

Sunday, December 18, 2011

DIY Plate Hangers

 Photo belongs to Meet Virginia


Decorative plate arrangements on the walls are just beautiful but you want to be sure they are anchored to the wall correctly. Plate hangers are not expensive but when you have to have more than a few it can add up. I thought I would share this DIY Plate Hanger Tutorial I found at Meet Virginia on how to make your own plate hangers.

Decorating with Plates


 Using dinner plates, salad plates and saucers to decorate your walls can yield fabulous results. More and more, people are using dinner plates to decorate their walls.  I found this at LuLu's.  I think this is amazing!! Plates are no longer just for eating dinner on.. You could find a ton of pretty and interesting plates at any thrift store.  Using plates as wall decor is popular these days and a group of plates on a wall really makes a statement in a room.  I think it's a fantastic way to re-purpose plates.  For tons more ideas go to:

Decorating with Plates: Using Plates to Decorate your walls

I bet you enjoy this!

Also, if you are interested here is a DIY Invisible Plate Hanger tutorial. These hangers will hang plates without showing any hardware or possibly damaging the plate like the old school wire plate hangers.